Van Window Installation Instructions
Van Conversion Windows: Ram Promaster Installation Instructions
Installation Guide Printable Version
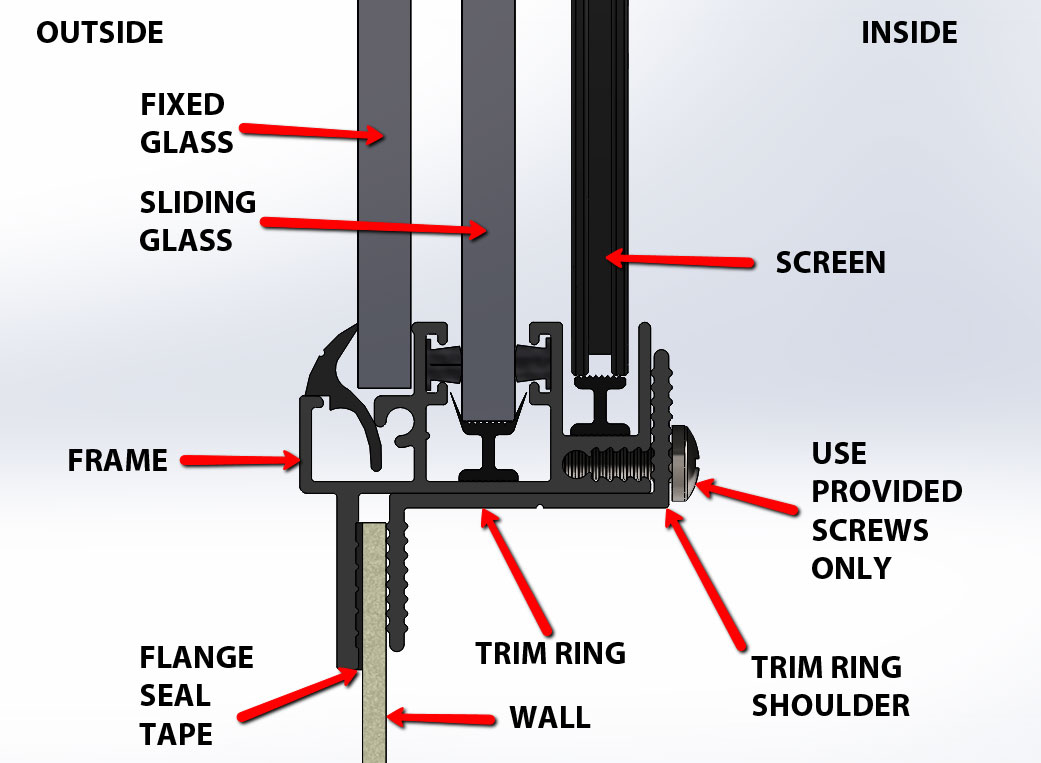
Cross Section View of Typical Installation
The Beginner’s Guide to Van Window Installation
If you have a new van, you may wonder whether or not to install windows. Van window installation can be challenging for some, especially for beginners just learning to do it.
Installing van windows may seem daunting, but it’s pretty simple with the right tools and a little know-how. Here are steps that can guide you to a successful RV window installation.
Step 1: Preparation
For the preparation, you will need the following tools:
- A drill
- A screwdriver
- A measuring tape
- Window sealant (optional)
Cleaning
Included in the cleaning is the cutting off of the brace inside the van. You will need a saw to make sure you have one handy before you start. Once removed, you can measure your van windows.
Measure the space’s width where you want to install the window, and then add an extra inch on each side. It will give you the size of window you need to order.
Smoothen burrs
Once you’ve cut the internal brace, you’ll need to clean up the burrs around the edges. You can use sandpaper to smooth out the edges. It will ensure that your van windows fit snugly and look professional.
Prepare to cut the perimeter
Trace the perimeter of the window on the inside of the van. Use a pencil or marker to trace the window’s outline, then cut along the line with a saw. It will serve as a guide to follow when you’re ready to install the window.
Cutting the perimeter
After you have traced the window outline, it’s time to cut the window hole. Use a jigsaw for this, so make sure you have one handy before you start.
Cut along the line you traced, and then remove the piece of van wall. You may need to use a file or sandpaper to smooth the hole’s edges. Once that’s done, you’re ready to install your new van windows.
Prepare the Spacer
The next step is to measure and fit the proper spacer for your window. The spacer is a material that goes between the window and the van wall and provides a seal against drafts and moisture.
You will need to measure the space between the window opening and the van wall and cut a piece of spacer to fit. Ensure the spacer is snug against the window and the van wall to form a good seal.
Step 2: Installation
Now that your window is ready, it’s time to install it.
1. Position the window in the opening and start to lower it into place. Ensure that the top of the window is level with the opening and the bottom is flush with the base. Once the window is in position, you can screw it in place.
2. Once you have positioned the window, you can start to screw it in place. Start with the screws that are at the top of the window. Then work your way down the sides of the window. Make sure that you don’t overtighten the screws. You want them to be snug to hold the window in place.
3. Once the screws are in place, you can add the trim. The trim will help to seal the window and give it a finished look. Placing it is pretty straightforward. You need to line it up with the edge of the window and then nail it in place. Start at one end of the window and work your way around.
4. Once the trim is in place, you can add the sealant. The sealant will help to keep the window from leaking air.
5. You can now add the glass. The glass will go in between the trim and the window.
6. Once the glass is in place, you can add the sealant to the inside of the window. It will help to keep the window from leaking air.
Step 3: Testing the Window After Installation
After you’ve installed your new RV window, it’s essential to test it to ensure it’s functioning correctly.
Here are a few ways:
- Open and close the window to ensure the seal is tight and there are no gaps.
- Look for any water leaks around the edges of the window.
- Make sure the locks on the window are working correctly.
- Check the operation of the window blinds or shades, if applicable.
When testing for water leaks after RV window installation, it is essential to check the inside and outside of the unit.
Using a water hose, spray the water over the outside window and check for leaks. Your RV is ready for a long trip if there are no leaks inside or outside the window.
If you notice a leak, don’t despair. Start caulking the outside of the window using a quality sealant. Once it dried, reattach the window and test it again for leaks. If the leak is inside the window, you’ll need to remove the window and reseal it with a sealant.
Another thing that you also need to consider is removing the drain plugs when testing for water leaks. They are at the bottom of the window and allow water to drain out.
Things to Consider When Choosing an RV Window
There are a few different factors that you should take into consideration when choosing the right van window for your needs.
1. Material of the Window
The material of the window is also important to consider. Windows can be made from various materials, including aluminum, glass, and fiberglass.
Aluminum windows are the most common type of RV window. They’re lightweight and durable, making them a good choice for fuel efficiency. Glass windows are more expensive but offer a better view. Fiberglass windows are the most vital option but also the heaviest.
If you decide to get a glass window, you need to select the type of glass. There are three types of glass: tempered, laminated, and plate.
- Tempered glass is the strongest but it’s also the most expensive.
- Laminated glass is less expensive, but it’s not as strong.
- Plate glass is the least costly, but it’s also the weakest.
2. Style of the Window
There are a variety of styles to choose from when it comes to RV windows. The most common one is the double-hung window, which has two sashes open and close. Other popular styles include the casement window, which opens outward, and the awning window, which opens from the bottom up.
When choosing the window style, you need to consider how you’ll use it. If you want a window that offers a lot of ventilation, then a double-hung window would be your best bet. If you plan on opening the window often, then a casement or awning window might be a better option.
3. Size of the window
You will need to measure the opening in your RV where the window will be placed. Once you obtain measurements, you can look for a window that will fit perfectly. If you are looking for a window that will provide better ventilation, you may want to choose a window slightly larger than the opening.
If you are looking for a window that will provide better insulation, you will want to choose a window that is the same size or slightly smaller than the opening. It will help to seal off any gaps around the window and keep the heat or cool air inside your RV.
4. The type of glass for RV Window
You can use a few different types of glass for RV windows, and the most common type is single-pane glass. It is the least expensive and does a decent job insulating your RV.
If you are looking for a window that provides better insulation, you may want to choose a double-pane glass. This type has two layers of glass with a layer of gas between them. The gas helps to insulate your RV and keep the heat or cool air inside your RV.
Another type of glass that you can use as RV windows is tinted glass. This type will help reduce the heat that comes into your RV. It is also helpful in reducing glare from the sun.
Safety glass is another type that is strengthened not to shatter easily.
5. The type of frame for RV Window
The most common type of frame for RV use is aluminum. It is lightweight and durable, and it resists rust and corrosion. Another type of frame that you can use for RV windows is vinyl. This type is also lightweight and durable. It is easy to maintain and does not require much upkeep.
Wood is another type that is the heaviest and most expensive. However, it provides a classic look that many people prefer.
6. The type of opening for the RV Window
There are a few different types of openings for RV windows: sliding, hinged and fixed.
The most common type is a sliding window. This type of window opens by sliding the window to the side. Another is a hinged window that opens by swinging the window open like a door.
Finally, there is a fixed window that does not open.
These are a few of the factors that you should take into consideration when choosing a window for van window installation. By selecting the right window, you can be sure that you will be happy with the results.
For windows for van installation, make sure you get high-quality ones. Contact RV Window today!
Van Converters & Upfitters Map
